Here at Button we care a lot about testing & automation so that our tests ‘run for free’. Testing on multiple devices is both relevant on Android and extremely resource and time intensive. The great folks at Google announced their Google Cloud Test Lab last year at I/O and we’ll now show you how we’ve integrated this into our fully automated continuous integration process.
Our setup is split in two, we have tests running locally on any change to any PR branch and master on a local Mac Mini and we now have these, more expensive tests that we run whenever master is changed.
By using Google Cloud Test Lab we can now test, fully parallelized on tens and tens of devices over a number of dimensions (language, device, OS version and screen orientation).
Our setup looks something like this, we run some tests on a physically tethered device to get quick feedback on changes to PR branches while the slower Cloud Test Lab job is run whenever master changes. On any active branch we also run a number of analysis steps to validate our SDK, these run locally on the agent.

Agent setup
These instructions do not cover how to setup a TeamCity agent for building Android projects, but you’d want to at least do the following:
- Setup TeamCity agent and pair with your master.
- Install SDK tools, java and optionally gradle.
- Update all SDK tools, device images, support repositories.
Follow the Google Cloud SDK setup instructions found here. If your agents run on OS X the setup instructions are as simple as:
$ curl https://sdk.cloud.google.com | bash
Restart your shell:
$ exec -l $SHELL
Run gcloud init to initialize the gcloud environment:
$ gcloud init
After gcloud init you will be prompted to login, follow the instructions and choose your project. For instructions on how to create a project and setup billing follow this FAQ answer.
After signing in and granting access you will have to choose your project from terminal, so switch back and enter the number corresponding to your project.
You are now logged in as: [xx@gmail.com]
Pick cloud project to use:
 [1] [api-project-1093346577xxx]
 [2] [api-project-1095758361xxx]
 [3] [cloud-tests-xxx]
 Please enter your numeric choice:  3
Your current project has been set to: [cloud-tests-xxx].
To verify your setup, let’s check for available devices (accept the prompts to download components):
gcloud beta test android devices listShould produce an overview like this:
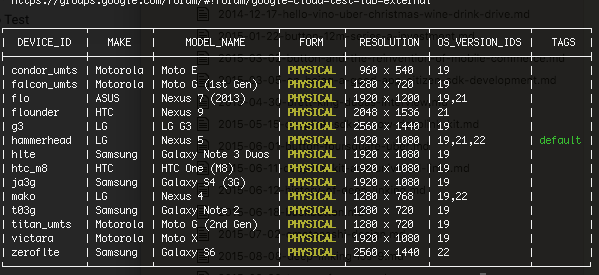
Some other useful commands that you can use to build your device test matrix.
# list android versions:
$ gcloud beta test android versions list
# list available locales
$ gcloud beta test android locales list
Make sure you restart your agent after installing and initializing the gcloud command line tool so it’s added to PATH.
The device, locale, orientation and OS version all will form dimensions in our test matrix. That’s it, your agent should be good to go, let’s setup the TeamCity job.
TeamCity job configuration
We’ll assume that you already have a job which checks out your Android source code and can assemble the relevant test targets of your application. Since our core product is an SDK we have a library module instead of an app, but the steps should be the same.
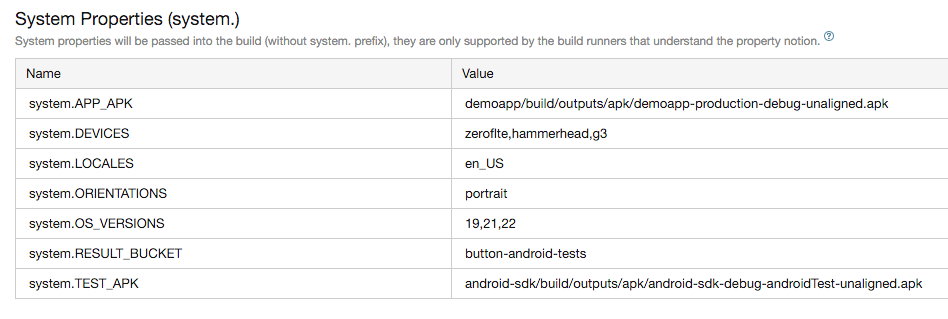
Job Parameters: We want to have a few parameters for our job, so go to the Parameters section and add the following System Properties. It might seem tedious to punch these in as parameters, but it makes changing them a lot easier without having to edit the bash code.
- system.APP_APK: relative path to your main apk.
- system.TEST_APK: relative path to your test apk.
- system.DEVICES:
comma separated list of DEVICE_IDs, found with
gcloud beta test android devices list. - system.LOCALES:
comma separated list of LOCALES, found with
gcloud beta test android locales list. - system.OS_VERSIONS: comma separated list of OS version, as found in the devices list.
- system.ORIENTATIONS: comma separated list of orientations (portrait/landscape).
- system.RESULT_BUCKET: the prefix for your results bucket, be creative as it should be unique.
All entered it should look like this:
Build Step 0:
First, let’s add a step to clean up after the previous run, add this as the first step of. Feel free to disable this step while you’re testing to speed up the job, but it’s important that you enable it so we’re certain that the test was ran with fresh apks so you don’t get false results.
Create a new command line runner step Clean Up with these lines:
echo "Cleaning up old APKs"
rm -f %system.APP_APK%
rm -f %system.TEST_APK%
Build Step 1:
Add a new build step of runner type gradle, name it Build APKs and and set it to build both your host (app under test) and test apk.
Most likely this will be the same module, so your gradle tasks field will be something like:
:app:assembleDebug :app:assembleAndroidTest. We have a host app demoapp, but our tests is a library android-sdk.
Build Step 2:
Next we’ll add a command line build runner Run Cloud Tests and adjust the below script to your app’s output paths.
gcloud --quiet beta test android run \
  --type instrumentation \
  --app %system.APP_APK% \
  --test %system.TEST_APK% \
  --device-ids %system.DEVICES% \
  --os-version-ids %system.OS_VERSIONS% \
  --locales %system.LOCALES% \
  --orientations %system.ORIENTATIONS% \
  --results-bucket %system.RESULT_BUCKET%-%system.teamcity.buildType.id%-%build.number%
We’re now ready to see things work so far, click run and follow the steps and see that they look OK.
Build Step 3:
Next we’ll pull the test results, since we piped the stdout from the test to our python script the URL to the results bucket is easily available. Since you probably want the results regardless of outcome, Show advanced options and select Even if some of the previous steps fails under Execute step:. Create a new command line step Pull Raw Results and have it run this command:
echo "Pulling test results from:"
echo "gs://%system.RESULT_BUCKET%-%build.number%"
mkdir results/
gsutil -m cp -r gs://%system.RESULT_BUCKET%-%build.number% results/
echo "Done copying, clean up."
gsutil rm -r gs://%system.RESULT_BUCKET%-%build.number%
Artifacts
Under General Settings give the path results to collect the results from the test run.
Artifacts path:
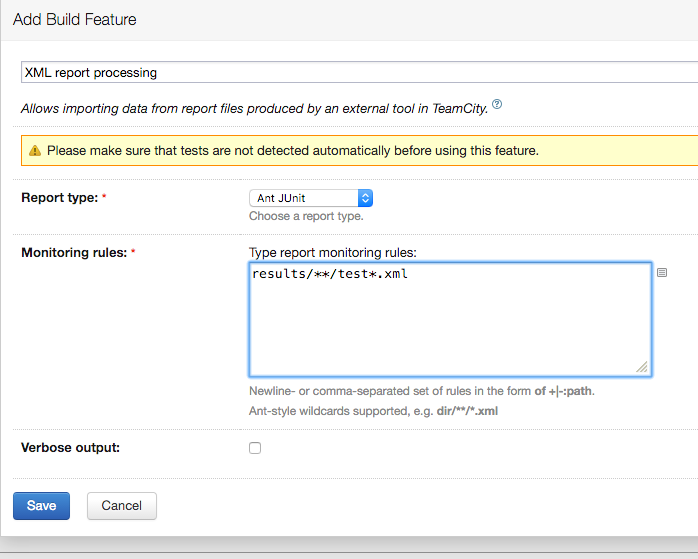
results => results.zipBuild features
TeamCity has excellent support for JUnit XML test reports which is part of the results we pulled from the Google Storage bucket. Let’s add a Build Feature for this, it should look like this if you followed our steps to the letter.
Done!
Add a trigger to your job or run it manually, Google Cloud Test Lab will now do all of the heavy lifting while you crank out code with confidence. You can find all the files from the test run under Artifacts including a video of each device as the tests run, super useful if you’re doing UI testing!
Next up: Make the device results look good as a custom report tab, stay tuned!